14 years at Google

Yesterday marked my 14 year Googleversary. I joined Google full time on October 1, 2007 as a new-grad straight from university. While for the Googleversary stats all that counts is full time employment, I was with Google way earlier. First as an intern between my second and third year at university starting on February 1, 2005, and then continuously throughout the rest of my studies as a temporary worker and via other internship contracts. The way this actual employment age shows is through the employee ID. Mine is in the 9,000 range, but people who joined about the time when I joined full-time have a 50,000 range ID. At the time of writing, 98.08871% of full time employees and extended workers have been at Alphabet for less time than me. During these 14 years, I've had 15 managers, some of them multiple times. I have 2.85-ified my salary (sounds impressive maybe, but I simply started very low), and have gone through three promotions. That's one promotion less than I think I could have had, but instead I enjoyed a different perk: I did my PhD on company time.

The PhD time (2010–2014) 🔗

While I wanted to do a PhD after three years on the job, I wasn't initially planning on doing it on company time. Quite the opposite. From February 1, 2010, I had reduced my work load to 60% to work on my PhD in the remaining 40%. After having this arrangement for two or three months, one evening my at the time manager's manager called to make me an offer I couldn't resist: to come back full time and work on I-SEARCH (A unIfied framework for multimodal content SEARCH), a three-year European project funded under FP7-ICT. This very manager left the company a couple of months later and his successor didn't see the same value in EU projects than the manager who left, and while they let me continue my (multi-year) work, my previous (Strongly) Exceeds ratings that I received for several quarters went down to regular Meets Expectations. Lesson learned in hindsight:

Never make your personal work arrangement depend on the goodwill of a sole manager, as powerful as this manager may appear.

During this time, I cranked out a number of publications (some of them fine, some of them mediocre), but above all made great friends and traveled the world. You can see me co-present the result of the project, a multimodal search engine, and to my surprise the user interface of I-SEARCH is still up.

My internship time (2005–2006) 🔗

My internship project—that sort of just evolved—was the Google AdWords PHP client library APIlity. At the time, the AdWords API (a very enterprise SOAP API) was brand new, and I happened to be the intern who was able to make it work. I had some experience with REST APIs from my Master's thesis, you can enjoy my first ever tech talk on the topic below.

The first few years (2007–2010) 🔗

During my first few full time years, I continued my work on the AdWords API as a Customer Solutions Engineer, but my heart always was with developer advocacy. I took on any opportunity I could get to hack my job and work with developers. One of my best memories is the 2008 series of Google Developer Days, where we toured all of Europe. Embedded below a presentation of mine on the Google Web Toolkit. An advantage of the early years was that Google was a lot smaller and job roles that were distinct in the US were still not present in Europe, so others like me who were just somewhat technical enough needed to jump in and represent locally.

After the PhD (2014–2018) 🔗

After finishing my PhD, I was (very naively so) disappointed that no one at the company cared. No pay raise. No job offer. I actually had to beg to go back to my previous Customer Solutions Engineer job that was the reason why I had started the PhD in the first place. While I tried for a while to get hired elsewhere and also switch jobs internally, nothing really worked out for various reasons (mostly location constraints and failed interviews). Another lesson learned:

Don't assume anyone in the company will care for your self-arranged further education. Having a PhD or not makes a difference as a new hire, but not later.

Getting into Chrome Developer Relations (2018) 🔗

Location always was a big factor in what roles you could get at Google. I made no secret of my interest in developer advocacy, but not being in one of the hub engineering offices meant this door was closed. I lobbied Paul Kinlan long enough until he eventually let me apply for a role on the Chrome Developer Relations team. The time between the interviews and the (thankfully positive) decision of the hiring committee was one of the most nerve-wrecking in my life. Long story short, it took me more than ten years to get the job I actually wanted. Not a real lesson, but more a reflection:

Taking an educated risk and doing what you really want while doing just enough to not get fired for doing too little of the things you actually get paid for is a strategy that sometimes works out. I wouldn't recommend it, unless you really, really want something.

Reflections on the present (2018–present) 🔗

Now I'm in Chrome Developer Relations since May 28, 2018 and it's an honestly great team to be on. My work is about evolving the Web and making things possible on the platform that were unthinkable before. I spoke twice at Google I/O, was part of Chrome Dev Summits, and presented at more international conferences than I can remember.

Ironically the corona crisis demonstrated that location didn't matter that much after all, at least for a distributed team like Chrome Developer Relations. Had corona come a couple of years ago, maybe they would have let me apply for the Developer Relations team way earlier, who knows. Since I started working for Google, I always lived a ten minute walk away from the office, but despite this short distance and even if I enjoy working in an office, I've now successfully applied for my position to be permanently remote. Mostly to secure the right.

What's next? 🔗

Is it time for the next gig? Maybe. It's very unusual for people in IT to stay on the same job for as long as I did. Will I see 15 years at Google? Who knows. Very probably so. For now, I'm definitely still having fun, at least most of the days. Have I become more cynical? Definitely. Do I panic when yet another re-org is being announced? Nope. One thing is certain, though: my heart still beats for the Web. Reach out if you have questions on anything that I wrote or if you want to discuss ideas. My DMs are open and my email is right on my About page.

Thomas Steiner
This post appeared first on https://blog.tomayac.com/2021/10/02/14-years-at-google/.

Public statement of support for Annalena Baerbock and die Grünen for #BTW21

It's not often that I post something with the Political tag on my blog. In the recent months and probably years, I've in the majority sticked to Technical posts, but this one is different. For folks like me in tech, it's way too easy to limit oneself to just the mostly uncontroversial (as in: it truly matters) technical stuff and stay silent about other aspects of life. Yesterday, I watched the Triell (the TV debate between the three candidates for the German chancellor, Armin Laschet, Olaf Scholz, and Annalena Baerbock) and I took this as an excuse to make my political standpoint public. It's uncomfortable and I hesitated a lot, but I think it's the right thing™ to do now.

As Annalena Baerbock from the Grünen party says: "The next government is the last one that can still actively influence the climate crisis." You may have heard of the 2021 floodings in Germany. Our response can't be to rebuild and move on. If we continue the laissez faire of the German car industry that Mr. Laschet, the candidate of the Christian Democratic Party CDU, demands, we mainly get electric (or worse, hybrid) SUVs for 50K€+, but not affordable small cars for regular incomes. We don't need a Merkel 2.0 that Mr. Scholz risks to become with a little bit of CO₂ pricing here and a little bit of exit from coal energy there.

We need a politics where "[o]ur children, our grandchildren shouldn't have to ask us: Why didn't you do anything? But: How did you do it?"Annalena Baerbock.

If you're not super familiar with the current German political pre-election situation, here's some recommended background reading:

If you want to join me in going public with your political views, here's how I did it. It may feel uncomfortable, "cost" you followers or subscribers to your blog, or maybe even stop people from talking to you (I hope we keep talking, even if we don't agree with each other), but I think it's worth it.

Thomas Steiner
This post appeared first on https://blog.tomayac.com/2021/09/13/public-statement-of-support-for-annalena-baerbock-and-die-gruenen-for-btw21/.

Dark Mode Web App Manifest App Icons

I was asked if one could use SVG web app manifest app icons that are reactive to prefers-color-scheme. To illustrate what this means, here is an excerpt of a manifest where I set the icon to an SVG that is reactive to the color scheme. You can play with it by navigating directly to icon.svg and toggling your operating system's color scheme setting.

{
"icons": [{
"src": "https://dark-mode-favicon.glitch.me/icon.svg",
"sizes": "144x144",
"type": "image/svg+xml"
}]
}

The icon itself is just an SVG with embedded CSS. You may remember it from my post prefers-color-scheme in SVG favicons for dark mode icons.

(Side remark about a little gotcha: Note how I need to "lie" about the icon's dimensions in the web app manifest, where I say it's 144x144 pixels compared to the width and height in the source code.)

<svg width="100" height="100" xmlns="http://www.w3.org/2000/svg">
<style>
circle {
fill: yellow;
stroke: black;
stroke-width: 3px;
}
@media (prefers-color-scheme: dark) {
circle {
fill: black;
stroke: yellow;
}
}
</style>
<circle cx="50" cy="50" r="47"/>
</svg>

So, to close this, the answer to the above question is yes, app icons will respect your preferred color scheme, but no, app icons won't update dynamically when you change your color scheme. Instead, they will keep their initial dark or light mode look from whatever you had your system set to at install time.

macOS Settings shows the system is set to light mode, but the app icon is still presented in dark mode, since it was installed when dark mode was enabled.

You can test it for yourself by installing the app embedded below (launch it in its own window).

(Credits: The app is a remix of Alexey Rodionov's app fir-skirt.glitch.me. Alexey, you guessed it, is also the one who asked me about this.)

Thomas Steiner
This post appeared first on https://blog.tomayac.com/2021/07/21/dark-mode-web-app-manifest-app-icons/.

Excalidraw and Project Fugu 🐡 at Google I/O

Google I/O 2020, like all the I/O conferences before, was planned as a physical event. But then the coronavirus struck, and I/O 2020 was the I/O that never was. In 2021, we had enough time to plan, so I/O 2021 was the first virtual event in the series.

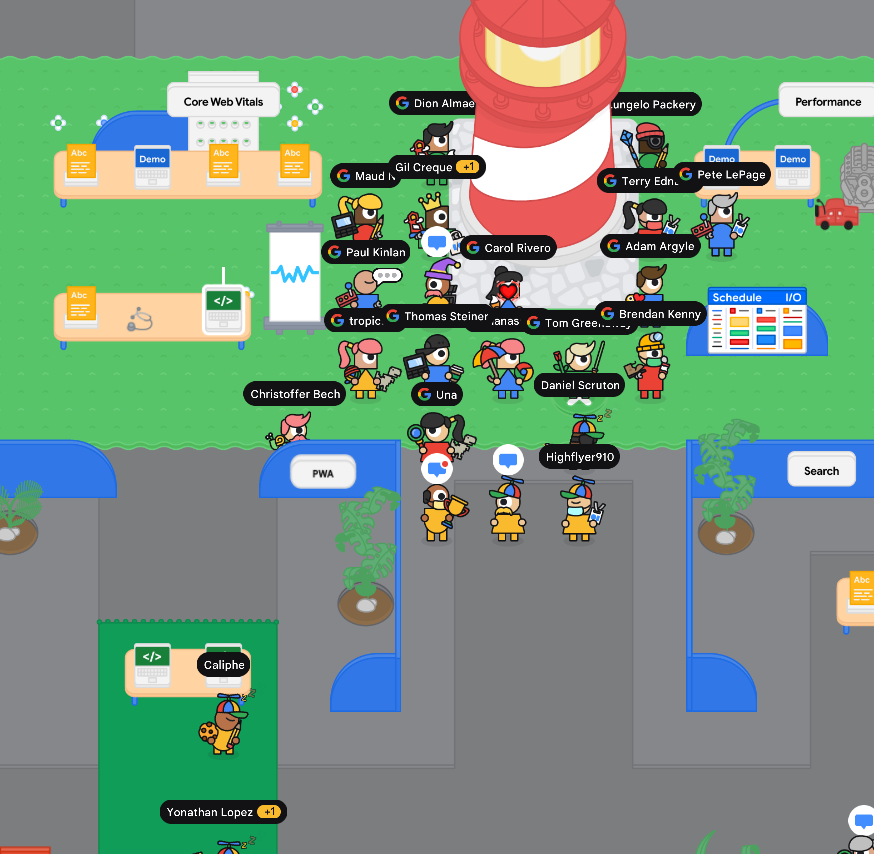
The team outdid themselves and recreated the entire experience as a virtual game. As Ars Technica wrote, Google's I/O Adventure was almost as good as being there. To get a feel for it, here's the official teaser video. During the event, you could bump into Googlers and talk to them, almost like in the real world. Below, you can see a team photo we took at the obligatory lighthouse. Can you spot me?

Google I/O Adventure team photo.

Together with @lipis, I had the pleasure of giving a talk titled Excalidraw and Fugu: Improving Core User Journeys. You can watch the talk in the video embed below, or read my video write-up over on web.dev.

I also created a codelab that covers a lot of the Project Fugu 🐡 APIs. You can work your way through it at your own pace, or if you want, re-join me in a virtual workshop session where you see me do it—and run into some minor service worker caching issues… 😅

Google I/O 2021 was in my opinion a good event that worked OK enough under the circumstances and with the constraints of the virtual format. With I/O in the books, we're looking what to do when it comes to events in the future. Virtual, physical, or hybrid? The planning phase for Chrome Dev Summit 2021 has already started… Stay tuned, and always root for Team Web!

Thomas Steiner
This post appeared first on https://blog.tomayac.com/2021/06/01/excalidraw-and-project-fugu-at-google-io/.

<ruby> HTML footnotes

It is sometimes surprising to me to see what kind of use cases HTML has a dedicated element for. Something that comes to mind is <output>, a container element into which a site or app can inject the results of a calculation or the outcome of a user action. For another use case that is arguably more common and which is also the topic of this blog post, HTML has nothing specific to offer: footnotesFootnotes are notes at the foot of the page while endnotes are collected under a separate heading at the end of a chapter, volume, or entire work. Unlike footnotes, endnotes have the advantage of not affecting the layout of the main text, but may cause inconvenience to readers who have to move back and forth between the main text and the endnotes..

Footnotes in HTML, then and now

Despite several proposals to deal with footnotes at the language level, HTML 3.0 Draft was the last version of HTML that offered the FN element. It was designed for footnotes, and when practical, footnotes were to be rendered as pop-up notes. You were supposed to use the element as in the code sample below (the inconsistent character casing sic).

<DL>
<DT>Hamlet:</DT>
<DD>
You should not have believed me, for virtue cannot so
<a href="#fn1">inoculate</a> our old stock but we shall
<a href="#fn2">relish of it</a>. I loved you not.
</DD>

<DT>Ophelia:</DT>
<DD>I was the more deceived.</DD>

<DT>Hamlet:</DT>
<DD>
Get thee to a nunnery. Why wouldst thou be a breeder of sinners? I am myself
<a href="#fn2">indifferent honest</a> ...
</DD>
</DL>

<fn id="fn1"><i>inoculate</i> - graft</fn>
<fn id="fn2"><i>relish of it</i> - smack of it (our old sinful nature)</fn>
<fn id="fn3"><i>indifferent honest</i> - moderately virtuous</fn>

The current HTML Living Standard (snapshot from January 22, 2021) remarks that HTML does not have a dedicated mechanism for marking up footnotes and recommends the following options for footnotes. For short inline annotations, the title attribute could be used.

<p><b>Customer</b>: Hello! I wish to register a complaint. Hello. Miss?</p>
<p>
<b>Shopkeeper</b>:
<span title="Colloquial pronunciation of 'What do you'">Watcha</span> mean,
miss?
</p>

<p>
<b>Customer</b>: Uh, I'm sorry, I have a cold. I wish to make a complaint.
</p>
<p>
<b>Shopkeeper</b>: Sorry,
<span title="This is, of course, a lie.">we're closing for lunch</span>.
</p>

Using title comes with an important downside, though, as the spec rightly notes.

Unfortunately, relying on the title attribute is currently discouraged as many user agents do not expose the attribute in an accessible manner as required by this specification (e.g. requiring a pointing device such as a mouse to cause a tooltip to appear, which excludes keyboard-only users and touch-only users, such as anyone with a modern phone or tablet).

For longer annotations, the a element should be used, pointing to an element later in the document. The convention is that the contents of the link be a number in square brackets.

<p>Announcer: Number 16: The <i>hand</i>.</p>
<p>
Interviewer: Good evening. I have with me in the studio tonight Mr Norman St
John Polevaulter, who for the past few years has been contradicting people. Mr
Polevaulter, why <em>do</em> you contradict people?
</p>

<p>
Norman: I don't. <sup><a href="#fn1" id="r1">[1]</a></sup>
</p>
<p>Interviewer: You told me you did! ...</p>

<section>
<p id="fn1">
<a href="#r1">[1]</a> This is, naturally, a lie, but paradoxically if it
were true he could not say so without contradicting the interviewer and thus
making it false.
</p>
</section>

This approach is what most folks use today, for example, Alex Russell or the HTML export of Google Docs documents.

The ruby element

The other day, I came across a tweet by Michael Scharnagl, whose website and Twitter handle are aptly named Just Markup and who runs a Twitter campaign this year called #HTMLElementInATweet:

Day 22: <ruby>

Represents small annotations

ℹ️ The term ruby originated as a unit of measurement used by typesetters, representing the smallest size that text can be printed on newsprint while remaining legible.

developer.mozilla.org/en-US/docs/Web…

#HTMLElementInATweet

— Michael Scharnagl (@justmarkup) January 22, 2021

I had heard about ruby in the past, but it was one of these elements that I tend to look up and forget immediately. This time, for some reason, I looked closer and even consulted the spec.

The ruby element allows one or more spans of phrasing content to be marked with ruby annotations. Ruby annotations are short runs of text presented alongside base text, primarily used in East Asian typography as a guide for pronunciation or to include other annotations. In Japanese, this form of typography is also known as furigana.

The rt element marks the ruby text component of a ruby annotation. When it is the child of a ruby element, it doesn't represent anything itself, but the ruby element uses it as part of determining what it represents.

You are supposed to use it like so.

<ruby> 明日 <rp>(</rp><rt>Ashita</rt><rp>)</rp> </ruby>

The MDN docs describe the ruby element as follows.

The HTML <ruby> element represents small annotations that are rendered above, below, or next to base text, usually used for showing the pronunciation of East Asian characters. It can also be used for annotating other kinds of text, but this usage is less common.

The term ruby originated as a unit of measurement used by typesetters, representing the smallest size that text can be printed on newsprint while remaining legible.

Hmm 🤔, this sounds like it could fit the footnotes use case. So I went and tried my luck in creating ruby HTML footnotes.

Using ruby for footnotes

The markup is straightforward, all you need are ruby for the footnote, and rt for the footnote text. I like that the footnote is just part of the flow text, so I do not need to mentally switch context when writing. I also do not have to manually number my footnotes and come up with and remember the value of ids. Another small advantage is that footnotes are not part of copied text, so when you copy content from my site, you do not end up with "text [2] like this". The snippet below shows the markup of a footnote.

<body tabindex="0">
<p>
Lorem ipsum dolor sit amet, consectetur adipiscing elit. Donec consectetur
dictum fermentum. Vivamus non fringilla dolor, in scelerisque massa. Quisque
mattis elit quam, eu hendrerit diam ultricies ut. Nunc sit amet velit
posuere, malesuada diam in, congue diam. Integer quis venenatis velit. Donec
quis nunc
<ruby tabindex="0"
>
vel purus<rt
>
Lorem ipsum dolor sit amet, consectetur adipiscing elit.
</rt></ruby
>

maximus dictum. Sed nec tempus odio. Vestibulum et lobortis ante. Duis
blandit pulvinar lectus non sollicitudin. Nulla non imperdiet diam. Fusce
varius ultricies sapien id pretium. Praesent ut pellentesque massa. Nunc eu
tellus hendrerit risus maximus porta. Maecenas in molestie erat.
</p>
</body>

The CSS to make the automatic footnote numbering work is based on a CSS counter. The rt is styled in a way that it is not displayed by default, and only gets shown when the ruby's :after, which holds the footnote number, is focused. For this to function properly, it is important to make the <ruby> element focusable by setting tabindex="0". On mobile devices, the body needs to be focusable as well, so the footnote can be closed again by clicking/tapping anywhere in the page. The rt element can contain phrasing content, so links and images are all fine. Another thing to remember is to make sure the rt element remains visible on :hover, so links can be clicked even when the ruby element loses focus. I have moved the CSS display value of rt into a CSS custom property, so I could easily play with different values. The CSS below is all it takes to make the footnotes work.

/* Behavior */

/* Set up the footnote counter and display style. */
body {
counter-reset: footnotes;
}

/* Make footnote text appear as `inline-block`. */
ruby {
--footnote-display: inline-block;
}

/* Display the actual footnote [1]. */
ruby:after {
counter-increment: footnotes;
/* The footnote is separated with a thin space. 🤓 */
content: ' [' counter(footnotes) ']';
}

/* Remove the focus ring. */
ruby:focus {
outline: none;
}

/* Display the footnote text. */
ruby:focus rt {
display: var(--footnote-display);
}

/* Hide footnote text by default. */
rt {
display: none;
}

/**
* Make sure the footnote text remains visible,
* so contained links can be clicked.
*/

rt:hover {
display: var(--footnote-display);
}

The following CSS snippet determines the look and feel of the footnotes.

/* Look and feel */

/* Footnote text styling. */
rt {
background-color: #eee;
color: #111;
padding: 0.2rem;
margin: 0.2rem;
max-width: 30ch;
}

/* Images in footnote text styling. */
rt img {
width: 100%;
height: auto;
display: block;
}

/* Footnote styling */
ruby:after {
color: red;
cursor: pointer;
font-size: 0.75rem;
vertical-align: top;
}

Something I could not get to work (yet) is to make the rt's CSS position to be absolute. I got the best results so far by making the rt an inline block by setting the CSS property --footnote-display: inline-block. I am well aware of ruby-align and ruby-position. The former does not have great browser support at the moment but seems relevant, and the latter seems to have no effect when I change the display value of rt to anything other than the UA stylesheet default, which is block. If you manage to get it to work such that footnote texts open inline, floating right under the footnote and not affecting the surrounding paragraph text, your help would be very welcome. I also still need to look into supporting printable footnotes. If you are interested, you can reach me and discuss this idea on Twitter.

Demo

I have enabled ruby footnotes right on my blog This is the second footnote, the other is at the top., but you can also play with a standalone demo on Glitch and remix its source code.

⚠️ Please note that this is not production ready. Support seems decent on Blink/WebKit-based browsers, but not so great on Gecko-based browsers like Firefox. I have opened an Issue with the CSS Working Group to hear their opinion on the idea.

Other approaches

The "standards nerd and technology enthusiast" Terence Eden proposed to use details in a blog post titled A (terrible?) way to do footnotes in HTML. Next, Peter-Paul Koch, web developer, consultant, and trainer, runs a side project named The Thidrekssaga and footnotes where for the current iteration of the site he just notes that his "implementation of footnotes is mostly shit". If you have yet another approach apart from what is listed here and above, please reach out and I am happy to add it. And as I wrote before, I am looking for help from CSS experts to make rt positioned absolutely. Sorry for the nerd-snipe.

Thomas Steiner
This post appeared first on https://blog.tomayac.com/2021/01/24/ruby-html-footnotes/.

Submitting and Distributing a Safari App Extension

Safari 14 has added support for the Web Extensions standard, which I consider a clever move on Apple's side that deprecated Safari's previous .safariextz-style Safari extensions. While there is great documentation for creating a Safari Web Extension from scratch or for converting a Web Extension for Safari (and at least the outlines for converting a legacy Safari extension to a Safari app extension), the documented path currently ends at building and running the application. This post documents the steps for submitting and distributing a Safari App Extension.

The post assumes you already have an Xcode project either created manually or via the converter script and that you use Swift. Here is an example build script for one of my extensions for reference. Some of these steps may improve or change over time for new versions of Xcode; this guide was written for Version 12.0 (12A7209). Caveat: this is my first time interacting with Xcode, so if any of the steps do not make sense, thanks for correcting me.

  1. Change the bundle identifier of the extension from com.example.foo-Extension to com.example.foo.Extension (that is, replace the '-' with a '.') and reflect the change in ViewController.swift. For some reason this is necessary. Xcode bundle identifier
  2. Change the App Category.
  3. Change the version number for app and extension.
  4. Update the build number in app and extension.
  5. Create a new certificate via your developer profile.
  6. Create a new app via App Store Connect.
  7. In Xcode, run Product > Build and then Product > Archive.
  8. In Xcode, open Window > Organizer and then first validate, then distribute (don't change any of the settings).
  9. Hope for the best…

I successfully went through the process with two extensions now:

(Thanks to Timothy Hatcher who has been very helpful in navigating me through the process.)

Thomas Steiner
This post appeared first on https://blog.tomayac.com/2020/11/09/submitting-and-distributing-a-safari-app-extension/.

Learning from Mini Apps—W3C TPAC Breakout Session

After my W3C TPAC breakout session focused on Project Fugu last year, this year, too, I ran a breakout session titled "Learning from Mini Apps" at the fully virtual TPAC 2020 event. In this breakout session, I first explained what mini apps are and how to build them, and then moved on to an open discussion focused on what Web developers can learn from mini apps and their developer experience. The TPAC folks have done an ace (👏) job and have put all the resources from my session online (and everyone else's of course):

General event recap

For being a first-time virtual event, communication went really well. It felt like everyone has learned by now how to discuss in virtual rooms, and Zoom as the communication platform held up well. While I appreciate the W3C team having made an effort to replace hallway conversations, I didn't attend any of these slots. It just felt exhausting to do those on top of 11pm meetings or 7am slots, apart from the "just fine" afternoon slots (the "golden hour" is actually super friendly for people in the EU), but time zones are hard.

Thomas Steiner
This post appeared first on https://blog.tomayac.com/2020/11/05/learning-from-mini-apps-w3c-tpac-breakout-session/.

Play the Chrome dino game on your Nintendo Switch

I have landed an article over on web.dev that talks about the Gamepad API. One piece of information from this article that our editorial board was not comfortable with having in there was instructions on how to play the Chrome dino game on a Nintendo Switch. So, here you go with the steps right here on my private blog instead.

The hands of a person playing the Chrome dino game on a Nintendo Switch.
Press any of the Nintendo Switch's buttons to play!

The Nintendo Switch contains a hidden browser, which serves for logging in to Wi-Fi networks behind a captive portal. The browser is pretty barebones and does not have a URL bar, but, once you have navigated to a page, it is fully usable. When doing a connection test in system settings, the Switch will detect that the captive portal is present and display an error for it when the response for http://conntest.nintendowifi.net/ does not include the X-Organization: Nintendo HTTP header. I can make creative use of this by pointing the Switch to a DNS server that simulates a captive portal that then redirects to a search engine.

  1. Go to System Settings and then Internet Settings and find the Wi-Fi network that your Switch is connected to. Tap Change Settings.
  2. Find the section with the DNS Settings and add 45.55.142.122 as a new Primary DNS. Note that this DNS server is not operated by me but a third-party, so proceed at your own risk.
  3. Save the settings and then tap Connect to This Network.
  4. The Switch will tell you that Registration is required to use this network. Tap Next.
  5. On the page that opens, make your way to Google.
  6. Search for "chrome dino tomayac". This should lead you to https://github.com/tomayac/chrome-dino-gamepad.
  7. On the right-hand side in the About section, find the link to https://tomayac.github.io/chrome-dino-gamepad/. Enjoy!
  8. 🚨 For regular Switch online services to work again, turn your DNS settings back to Automatic. Conveniently, the Switch remembers previous manual DNS settings, so you can easily toggle between Automatic and Manual.

For the Chrome dino gamepad demo to work, I have ripped out the Chrome dino game from the core Chromium project (updating an earlier effort by Arnelle Ballane), placed it on a standalone site, extended the existing gamepad API implementation by adding ducking and vibration effects, created a full screen mode, and Mehul Satardekar contributed a dark mode implementation. Happy gaming!

You can also play Chrome dino with your gamepad on this very site. The source code is available on GitHub. Check out the gamepad polling implementation in trex-runner.js and note how it is emulating key presses.

Thomas Steiner
This post appeared first on https://blog.tomayac.com/2020/11/04/play-the-chrome-dino-game-on-your-nintendo-switch/.

My Working From Home Setup During COVID-19

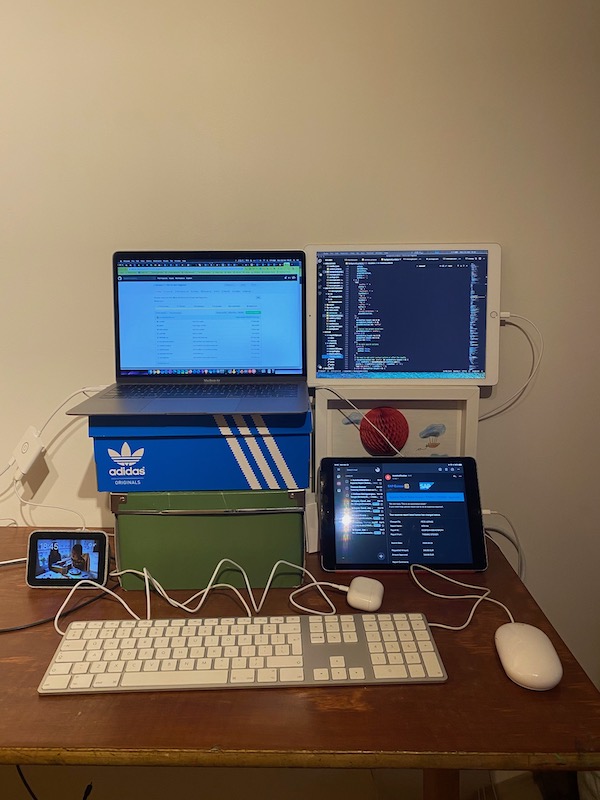
Google, like many other companies, has a required working from home (WFH) policy during the COVID-19 crisis. It has taken me a bit, but now I have found a decent WFH setup.

The Hardware

My COVID-19 working from home setup

The Software

  • The Sidecar feature, so I can use my iPad Pro as a second screen with my MacBook Air. The coolest about this feature is that I can multitask it away (see next bullet) without the laptop readjusting the screen arrangement.
  • The Hangouts Meet app on my iPad Pro, so my laptop performance stays unaffected when I am on a video call. A nice side-effect is that the camera of the iPad Pro is in the middle of my two screens, so no weird "looking over the other person" effect when I am on a call.
  • The Gmail app on my iPad Air, so I can always have an eye on my email.
  • (Honorable mention) The iDisplay app on the iPad Air with the iDisplay server running on the laptop, so I can use the iPad Air as a third screen. Unfortunately, since I do not have another free USB C port on my laptop, it is really laggy over Wi-Fi, but works when I really need maximum screen real estate.
  • (Out of scope) The Free Sidecar project promises to enable Sidecar on older iPads like my iPad Air 2, since apparently Apple simply blocks older devices for no particular reason. It requires temporarily turning off System Integrity Protection, which is something I cannot (and do not want to) do on my corporate laptop.

The Furniture

  • A school desk—This is a desk we had bought earlier on eBay, placed on two kids' chairs to convert it into a standing desk.
  • Some shoe boxes to elevate the two main screens to eye height. I had quite some neck pain during the first couple of days.

It is definitely not perfect, but I am quite happy with it now. I very much want the crisis to be over, but (with the kids back in school), I could probably get used to permanently working from home.

Thomas Steiner
This post appeared first on https://blog.tomayac.com/2020/03/23/my-working-from-home-setup-during-covid-19/.

Multi-MIME Type Copying with the Async Clipboard API

Copying an Image

The Asynchronous Clipboard API provides direct access to read and write clipboard data. Apart from text, since Chrome 76, you can also copy and paste image data with the API. For more details on this, check out my article on web.dev. Here's the gist of how copying an image blob works:

const copy = async (blob) => {
try {
await navigator.clipboard.write([
new ClipboardItem({
[blob.type]: blob,
}),
]);
} catch (err) {
console.error(err.name, err.message);
}
};

Note that you need to pass an array of ClipboardItems to the navigator.clipboard.write() method, which implies that you can place more than one item on the clipboard (but this is not yet implemented in Chrome as of March 2020).

I have to admit, I only used to think of the clipboard as a one-item stack, so any new item replaces the existing one. However, for example, Microsoft Office 365's clipboard on Windows 10 supports up to 24 clipboard items.

Pasting an Image

The generic code for pasting an image, that is, for reading from the clipboard, is a little more involved. Also be advised that reading from the clipboard triggers a permission prompt before the read operation can succeed. Here's the trimmed down example from my article:

const paste = async () => {
try {
const clipboardItems = await navigator.clipboard.read();
for (const clipboardItem of clipboardItems) {
for (const type of clipboardItem.types) {
return await clipboardItem.getType(type);
}
}
} catch (err) {
console.error(err.name, err.message);
}
}

See how I first iterate over all clipboardItems (reminder, there can be just one in the current implementation), but then also iterate over all clipboardItem.types of each individual clipboardItem, only to then just stop at the first type and return whatever blob I encounter there. So far I haven't really payed much attention to what this enables, but yesterday, I had a sudden epiphany 🤯.

Content Negotiation

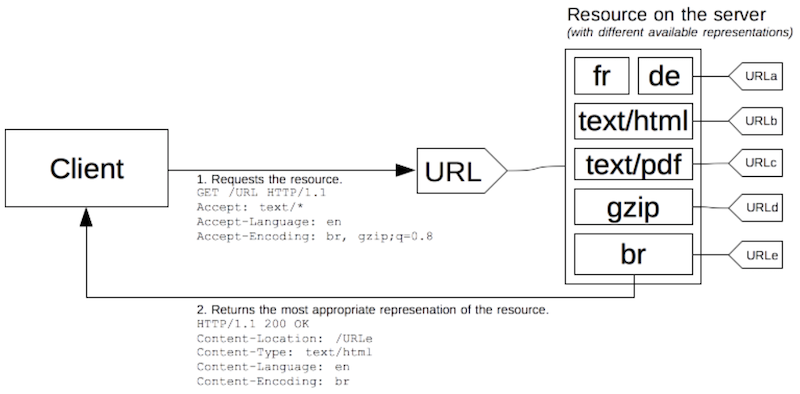
Before I get into the details of multi-MIME type copying, let me quickly derail to server-driven content negotiation, quoting straight from MDN:

In server-driven content negotiation, or proactive content negotiation, the browser (or any other kind of user-agent) sends several HTTP headers along with the URL. These headers describe the preferred choice of the user. The server uses them as hints and an internal algorithm chooses the best content to serve to the client.

Server-driven content negotiation diagram

Multi-MIME Type Copying

A similar content negotiation mechanism takes place with copying. You have probably encountered this effect before when you have copied rich text, like formatted HTML, into a plain text field: the rich text is automatically converted to plain text. (💡 Pro tip: to force pasting into a rich text context without formatting, use Ctrl + Shift + v on Windows, or Cmd + Shift + v on macOS.)

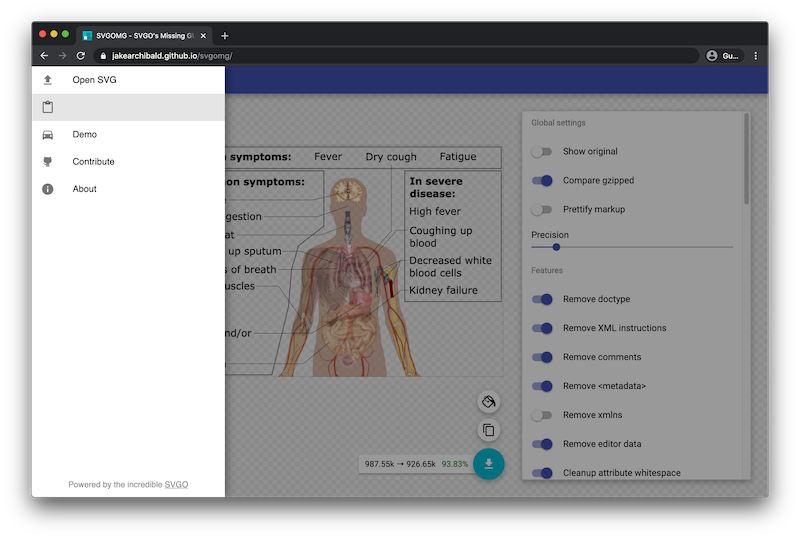
So back to content negotiation with image copying. If you copy an SVG image, then open macOS Preview, and finally click "File" > "New from Clipboard", you would probably expect an image to be pasted. However, if you copy an SVG image and paste it into Visual Studio Code or into SVGOMG's "Paste markup" field, you would probably expect the source code to be pasted.

With multi-MIME type copying, you can achieve exactly that 🎉. Below is the code of a future-proof copy function and some helper methods with the following functionality:

  • For images that are not SVGs, it creates a textual representation based on the image's alt text attribute. For SVG images, it creates a textual representation based on the SVG source code.
  • At present, the Async Clipboard API only works with image/png, but nevertheless the code tries to put a representation in the image's original MIME type into the clipboard, apart from a PNG representation.

So in the generic case, for an SVG image, you would end up with three representations: the source code as text/plain, the SVG image as image/svg+xml, and a PNG render as image/png.

const copy = async (img) => {
// This assumes you have marked up images like so:
// <img
// src="foo.svg"
// data-mime-type="image/svg+xml"
// alt="Foo">
//
// Applying this markup could be automated
// (for all applicable MIME types):
//
// document.querySelectorAll('img[src*=".svg"]')
// .forEach((img) => {
// img.dataset.mimeType = 'image/svg+xml';
// });
const mimeType = img.dataset.mimeType;
// Always create a textual representation based on the
// `alt` text, or based on the source code for SVG images.
let text = null;
if (mimeType === 'image/svg+xml') {
text = await toSourceBlob(img);
} else {
text = new Blob([img.alt], {type: 'text/plain'})
}
const clipboardData = {
'text/plain': text,
};
// Always create a PNG representation.
clipboardData['image/png'] = await toPNGBlob(img);
// When dealing with a non-PNG image, create a
// representation in the MIME type in question.
if (mimeType !== 'image/png') {
clipboardData[mimeType] = await toOriginBlob(img);
}
try {
await navigator.clipboard.write([
new ClipboardItem(clipboardData),
]);
} catch (err) {
// Currently only `text/plain` and `image/png` are
// implemented, so if there is a `NotAllowedError`,
// remove the other representation.
console.warn(err.name, err.message);
if (err.name === 'NotAllowedError') {
const disallowedMimeType = err.message.replace(
/^.*?\s(\w+\/[^\s]+).*?$/, '$1')
delete clipboardData[disallowedMimeType];
try {
await navigator.clipboard.write([
new ClipboardItem(clipboardData),
]);
} catch (err) {
throw err;
}
}
}
// Log what's ultimately on the clipboard.
console.log(clipboardData);
};

// Draws an image on an offscreen canvas
// and converts it to a PNG blob.
const toPNGBlob = async (img) => {
const canvas = new OffscreenCanvas(
img.naturalWidth, img.naturalHeight);
const ctx = canvas.getContext('2d');
// This removes transparency. Remove at will.
ctx.fillStyle = '#fff';
ctx.fillRect(0, 0, canvas.width, canvas.height);
ctx.drawImage(img, 0, 0);
return await canvas.convertToBlob();
};

// Fetches an image resource and returns
// its blob of whatever MIME type.
const toOriginBlob = async (img) => {
const response = await fetch(img.src);
return await response.blob();
};

// Fetches an SVG image resource and returns
// a blob based on the source code.
const toSourceBlob = async (img) => {
const response = await fetch(img.src);
const source = await response.text();
return new Blob([source], {type: 'text/plain'});
};

If you use this copy function (demo below ⤵️) to copy an SVG image, for example, everyone's favorite symptoms of coronavirus 🦠 disease diagram, and paste it in macOS Preview (that does not support SVG) or the "Paste markup" field of SVGOMG, this is what you get:

The macOS Preview app with a pasted PNG image.
The SVGOMG web app with a pasted SVG image.

Demo

You can play with this code in the embedded example below. Unfortunately you can't play with this code in the embedded example below yet, since webappsec-feature-policy#322 is still open. The demo works if you open it directly on Glitch.

Conclusion

Programmatic multi-MIME type copying is a powerful feature. At present, the Async Clipboard API is still limited, but raw clipboard access is on the radar of the 🐡 Project Fugu team that I am a small part of. The feature is being tracked as crbug/897289.

All that being said, raw clipboard access has its risks, too, as clearly pointed out in the TAG review. I do hope use cases like multi-MIME type copying that I have motivated in this blog post can help create developer enthusiasm so that browser engineers and security experts can make sure the feature gets implemented and lands in a secure way.

Thomas Steiner
This post appeared first on https://blog.tomayac.com/2020/03/20/multi-mime-type-copying-with-the-async-clipboard-api/.